Habitat bright ideas with Fleur Thorpe – DIY projects
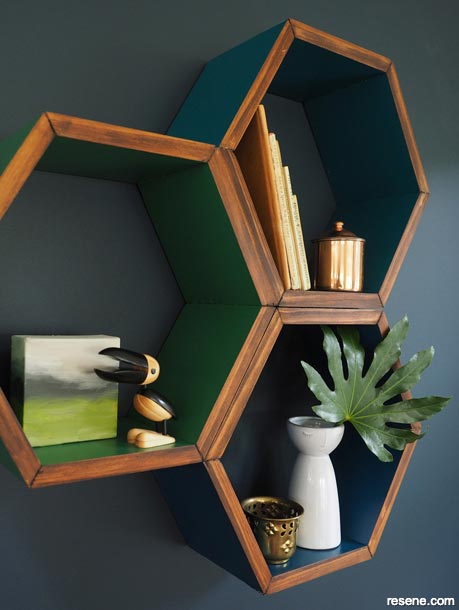
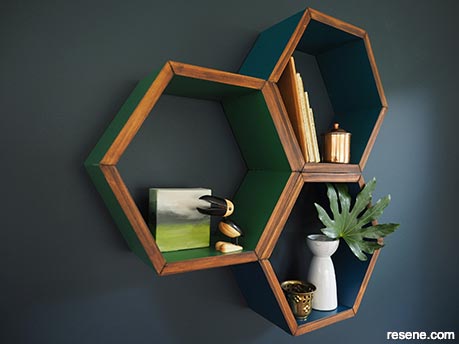
Honeycomb shelves are a handy way to display favourite treasures in curated clusters. You can make them so the wall colour shows through the back of the shelf or paint each honeycomb interior back to a new colour.
Wall painted in Resene Dark Knight
 Step 1
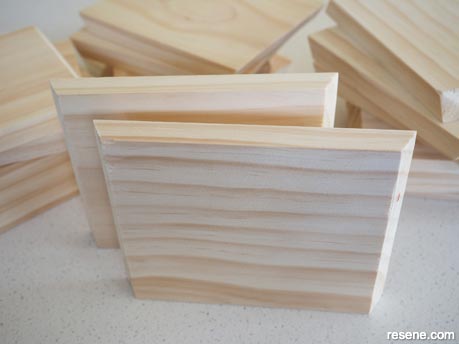
Set your mitre saw to a cutting angle of 30 degrees and cut your length of wood into 18 equal lengths so that the long side of the finished board in 18cm long. Use sandpaper to remove any rough edges. Wipe off sanding dust.
 Step 2
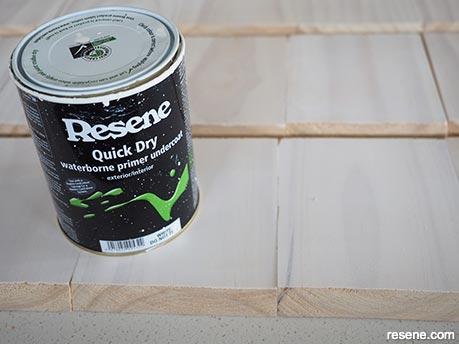
Use a small microfibre roller to apply Resene Quick Dry to the front and back of the boards. Fleur found it quick to line all the boards up and go over them with the roller en masse rather than individually.
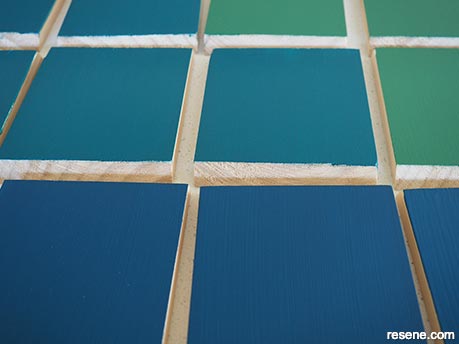 Step 3
Once you have painted both side and the primer is dry, give the primer a quick sand with a fine grit sandpaper. Remove any dust with a soft dry cloth. Use a paintbrush to paint on two coats of each of your colours. Fleur used three different colours, one colour for each hexagon – Resene Lustacryl tinted to Resene Green Pea, Resene Retro and Resene St Kilda. Once the paint is dry, sand the edges to remove any paint that may have gotten on them. Wipe off sanding dust.
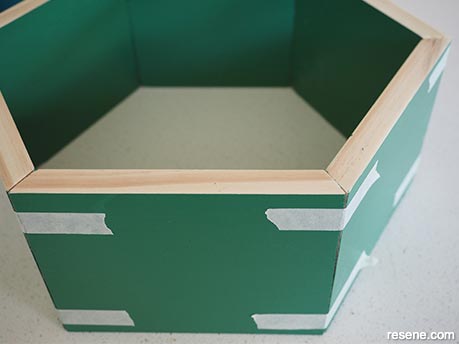 Step 4
Use wood glue to glue your hexagon together. Fleur found it helpful to use some masking tape to hold the edges together while the glue dried. If you are unsure of the strength of your glue and/or you want to put heavy items on your shelf, then you may want to screw or nail your corners together. If you use screws, it’s a good idea to drill a pilot hole first to help avoid the wood from splitting, and you will achieve a better finished look if you countersink the hole, use hole filler, sand the filler smooth and paint over.
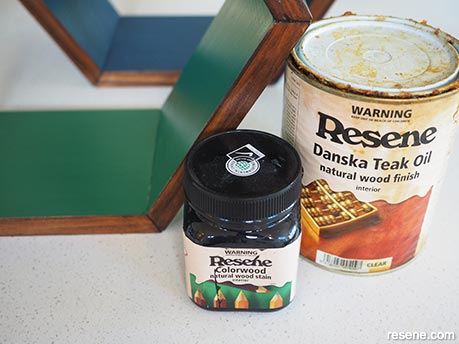 Step 5
Along the exposed front edge of the shelves, use a soft cloth to rub on one coat of Resene Colorwood in Resene Teak, followed by two coats of Resene Danska Teak Oil. For the oil, apply each one coat and then let it sit for 20 minutes and wipe the excess off. Then repeat with the second coat.
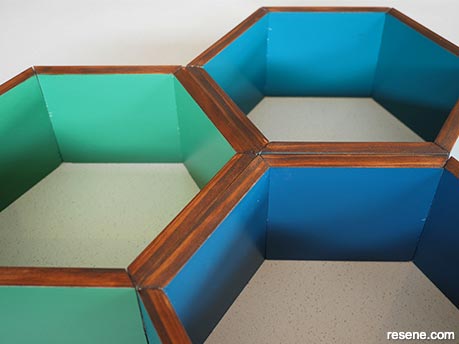 Step 6
You can now glue or screw the hexagons to each other.
 Step 7
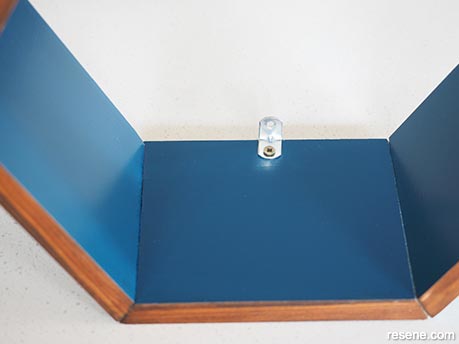
Screw a small L-shaped bracket at the back on the bottom inside shelf of each hexagon. If you screw the brackets to the bottom inside shelf, then they should be obscured from view by the items on your shelves. The size of your brackets will depend on how big you have made your shelves and how heavy you intend to load them up.
 Step 8
Use screws to mount the shelves to your wall, ideally screwing them into wall studs or using plasterboard screw anchors.
Top tip: Paint objects on display in colours to suit your room using Resene testpots. For most objects all you need is a quick clean and then you can paint.
Styling and images by Fleur Thorpe. Sep 2021.
Habitat bright ideas
Need to add colour, pattern or a little creativity to your place? Check out these easy step by step DIY project ideas created in collaboration with Fleur Thorpe. We hope you enjoy making and painting these bright ideas and bringing colour to your home inside or out.
![]() Get inspired ! Subscribe
Get inspired ! Subscribe ![]() Get saving ! Apply for a DIY card
Get saving ! Apply for a DIY card
![]()
Can't find what you're looking for? Ask us!
Company profile | Terms | Privacy policy | Quality and environmental policy | Health and safety policy
Colours shown on this website are a representation only. Please refer to the actual paint or product sample. Resene colour charts, testpots and samples are available for ordering online. See measurements/conversions for more details on how electronic colour values are achieved.
What's new | Specifiers | Painters | DIYers | Artists | Kids | Sitemap | Home | TOP ⇧