Habitat bright ideas with Fleur Thorpe – DIY projects
Create a one-of-a-kind headboard for your room with a combination of your favourite Resene wallpapers and paint colours.
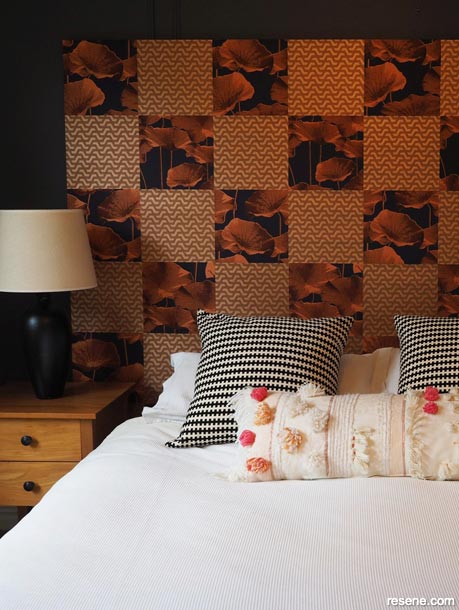
Step 1: Start by working out how big you want your headboard. Fleur worked out the size of hers based on the widths of the two wallpapers that she was using and the height of the bedroom door. Don't make the headboard so big that you can't get it into your room! Fleur made hers wide enough for four drops of the floral wallpaper hung vertically (213.9cm) and tall enough for 3.5 drops of the geometric wallpaper hung horizontally (182.6cm). Fleur would have made it taller to fit 4 drops horizontally but then it wouldn’t have fitted in the room. Add on a few millimetres to each measurement to allow for a slight gap between each strip of wallpaper.
Step 2: Buy 2 sheets of 9mm interior plywood and get them cut by the retailer into three pieces (60cm, 60cm and 62.6cm) to make up the total height of 182.6cm. This will help them fit into a car. If you have a trailer you could avoid cutting one of the sheets.
Step 3: Lay out your plywood on the floor and use wood glue to attach a frame around the outside using 18mm x 18mm wood. Use a screw to secure each corner. Then use the same type of wood to make two vertical braces, again using a screw to secure each join. Measure and cut some 10mm x 40mm wood and glue this to the joins in the plywood so that they sit rigid and flat. Place weights on the wood while it dries. You could also use some brad nails or small finishing nails for extra strength.
Step 4: I flipped the headboard over to the front and used a roller to paint on Resene Quick Dry, followed by two coats of Resene SpaceCote in Resene Black Rock, allowing each coat to dry before adding the next. This step may seem a bit redundant, but it is important for disguising any gaps in your weaving later.
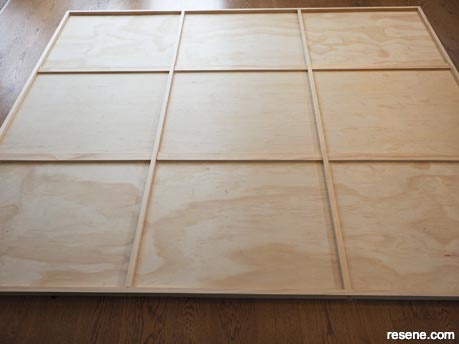
Photo one
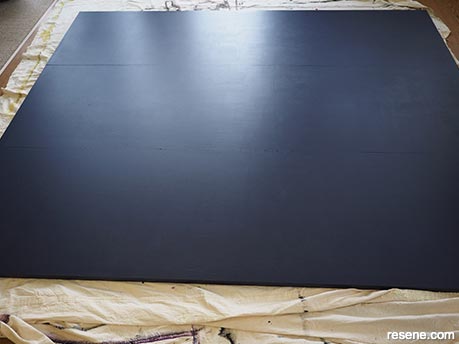
Photo two
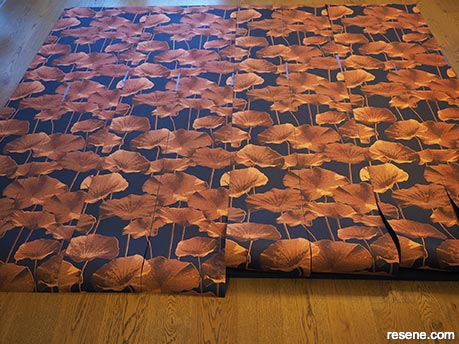
Photo two
Step 5: Cut your wallpaper into lengths, allowing for a bit extra to wrap around the back of the head board at both ends. Next, use a pencil and ruler and measure the middle of the width of the wallpapers and draw a pencil line on the back of the paper. Use scissors to cut the wallpaper into two long strips.
Step 6: To attach the wallpaper, use a staple gun and staple the paper to the top edge of the frame. Leave one millimetre between each strip to allow for the horizontal paper to fit between. Make measurement marks with a pencil at the bottom of the headboard so you can check the paper is hanging straight. A bit of painters tape is also helpful in temporally keeping the wallpaper vertical.
Step 7: Take the first piece of the geometric wallpaper and weave this in and out of the floral paper. When you’re happy with its position, put some glue underneath the paper to glue it to the ply and smooth it flat with your hand.
Step 8: Proceed with the next piece of geometric paper, making sure that the weave pattern is correct and glue it down when you are happy with its position. Keep checking that the vertical paper is staying vertical and that nothing is creeping out of line. Use painters tape to help you keep things in place.
Step 9: Proceed with weaving the rest of the paper and gluing as you go.
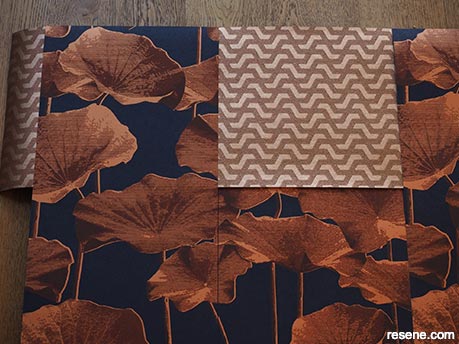
Photo four
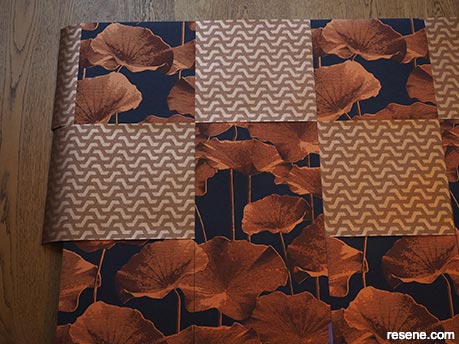
Photo five
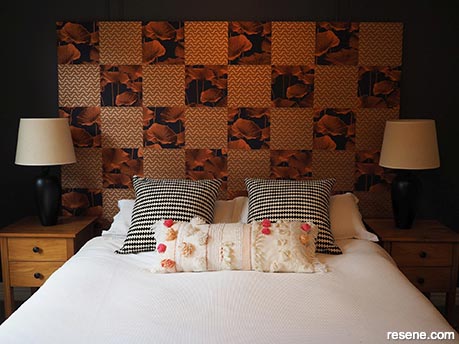
Photo six
Step 10: When you're finished gluing the paper in place, flip the headboard over and staple the ends to the back of the frame.
Step 11: Secure your headboard to the wall with a couple of long screws, ideally screwing into wall studs. Use a dab of Resene Black Rock or Resene Magma to help hide the screws.
Top tip: Make sure that the pattern on the Resene wallpaper that you use horizontally will look good on its side. Geometric patterns should work fine, whereas florals with the leaves and flowers growing upwards can look odd on their side.
Styling and images by Fleur Thorpe. Aug 2021.
Habitat bright ideas
Need to add colour, pattern or a little creativity to your place? Check out these easy step by step DIY project ideas created in collaboration with Fleur Thorpe. We hope you enjoy making and painting these bright ideas and bringing colour to your home inside or out.
![]() Get inspired ! Subscribe
Get inspired ! Subscribe ![]() Get saving ! Apply for a DIY card
Get saving ! Apply for a DIY card
![]()
Can't find what you're looking for? Ask us!
Company profile | Terms | Privacy policy | Quality and environmental policy | Health and safety policy
Colours shown on this website are a representation only. Please refer to the actual paint or product sample. Resene colour charts, testpots and samples are available for ordering online. See measurements/conversions for more details on how electronic colour values are achieved.
What's new | Specifiers | Painters | DIYers | Artists | Kids | Sitemap | Home | TOP ⇧