From the Resene decorating blog
Insider secrets for the perfect paint finishes when you’re doing it yourself.
Deliberating about DIY-ing but not sure if your skills are up to the task? Check out these top tips from Resene for achieving an impeccable finish on projects inside and out.
Available from your local Resene ColorShop, painter’s tape is your secret weapon when creating effects like this room. Use it to ‘mask’ to ensure crisp, clean lines; unlike traditional masking tape, when applied to a clean, dry surface, it won’t allow seepage, tear when removed, leave any residue or damage any existing paint.
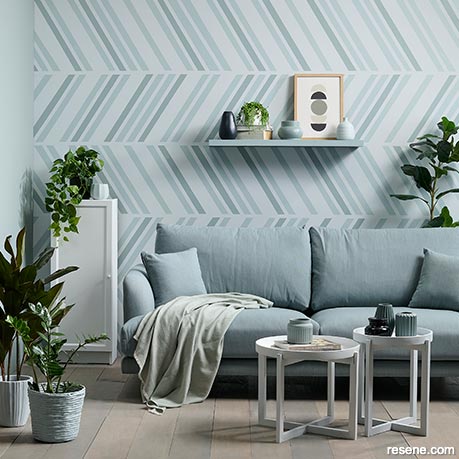
Left wall painted in Resene Half Inside Back, right wall in Resene Quarter Duck Egg Blue, with stripes in Resene Duck Egg Blue and Resene Inside Back, floor in Resene Colorwood Mid Greywash, plant pots in Resene Duck Egg Blue and Resene Quarter Duck Egg Blue, cabinet in Resene Half Sea Fog, shelf in Resene Duck Egg Blue, artwork in Resene Milk White, Resene Taupe Grey and Resene Fuscous Grey with background in Resene Half Black White, coffee tables in Resene Half Sea Fog and Resene Quarter Duck Egg Blue and vases in Resene Innocence, Resene Half Inside Back, Resene Dark Slate, Resene Inside Back, Resene Duck Egg Blue and Resene Woodsmoke. Sofa from Nood, throw from Città. Project by Laura Lynn Johnston, image by Bryce Carleton.
Changing the stripes of this living space, our graphic design incorporates a trio of tonal paints: two different strengths of shell-like Resene Duck Egg Blue, plus weightier grey-green Resene Inside Back. To DIY like a pro at your place, plan your design on paper, then after painting the wall with your backdrop colour, use a pencil, ruler and level to transfer it to the wall, starting from a corner and working in 30cm increments. Next, mask the lines with painter’s tape, applying pressure to make sure it fully adheres – a flexible putty knife can assist with this. Paint your stripes, allow to dry, then remove the tape.
Fine lines: Left wall painted in Resene Half Inside Back, right wall in Resene Quarter Duck Egg Blue, with stripes in Resene Duck Egg Blue and Resene Inside Back, floor in Resene Colorwood Mid Greywash, plant pots in Resene Duck Egg Blue and Resene Quarter Duck Egg Blue, cabinet in Resene Half Sea Fog, shelf in Resene Duck Egg Blue, artwork in Resene Milk White, Resene Taupe Grey and Resene Fuscous Grey with background in Resene Half Black White, coffee tables in Resene Half Sea Fog and Resene Quarter Duck Egg Blue and vases in Resene Innocence, Resene Half Inside Back, Resene Dark Slate, Resene Inside Back, Resene Duck Egg Blue and Resene Woodsmoke. Sofa from Nood, throw from Città. Project by Laura Lynn Johnston, image by Bryce Carleton.
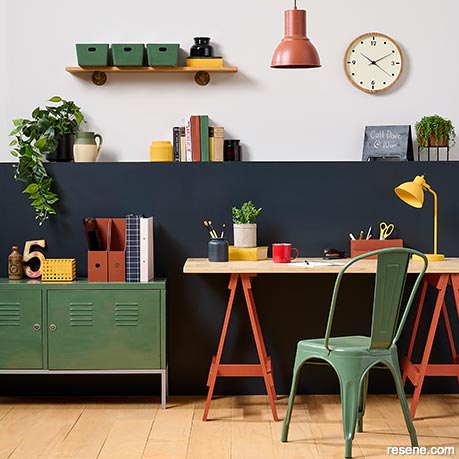
Light work: Upper wall in Resene Quarter Ash, lower wall/ledge in Resene Cinder, floor in Resene Colorwood Natural, shelf in Resene Colorwood Natural with supports in Resene FX Faux Rust Effect, bins on shelf, locker and chair in Resene Half Forest Green, pendant light and desk legs in Resene Mocha, lamp in Resene Fuel Yellow, plant pots in Resene Mocha (raised) and Resene Nero (with ivy), ribbed jar in Resene Fuel Yellow, painted books in Resene Mocha, Resene Fuel Yellow and Resene Half Forest Green, perforated bin in Resene Fuel Yellow, magazine holders in Resene Mocha, paintbrush jar in Resene Cinder, desk organiser in Resene Mocha and chalkboard in Resene Cinder. Trestle desk from Mocka, clock from Nood, rug from Città. Project by Laura Lynn Johnston, image by Bryce Carleton.
We can’t guarantee your productivity will soar if you update your WFH zone to be as industrial-chic as this, but we can predict that the results of any DIY office makeover will be all the more polished if it’s not just colour you take into account. The success of any paint job is as much about selecting the appropriate finish as it is colours you love, and considering function as well as form.
Upper wall in Resene Quarter Ash, lower wall/ledge in Resene Cinder, floor in Resene Colorwood Natural, shelf in Resene Colorwood Natural with supports in Resene FX Faux Rust Effect, bins on shelf, locker and chair in Resene Half Forest Green, pendant light and desk legs in Resene Mocha, lamp in Resene Fuel Yellow, plant pots in Resene Mocha (raised) and Resene Nero (with ivy), ribbed jar in Resene Fuel Yellow, painted books in Resene Mocha, Resene Fuel Yellow and Resene Half Forest Green, perforated bin in Resene Fuel Yellow, magazine holders in Resene Mocha, paintbrush jar in Resene Cinder, desk organiser in Resene Mocha and chalkboard in Resene Cinder. Trestle desk from Mocka, clock from Nood, rug from Città. Project by Laura Lynn Johnston, image by Bryce Carleton.
First, determine how much natural light there is in the room. The hard-wearing, easy-clean, stain-resistant gloss finish of Resene Enamacryl (used on this cabinet and chair) and semi-gloss Resene Lustacryl reflect lots of light, making them ideal for darker or smaller spaces. Further down the shine spectrum are durable, adaptable Resene SpaceCote Low Sheen and Resene SpaceCote Flat; they don’t reflect as much light so are perfect for areas prone to dents and dings – like walls. At the far end of the spectrum are matte finishes such as Karen Walker Chalk Colour paint that diffuse the light, concealing imperfections while offering a vintage look. Taking this idea further is the Resene FX Faux Rust Effect used to age the pipes that support this shelf, while Resene Colorwood Natural gives the floor a weathered appearance.
Dial up the drama in your dining area by making it an immersive experience through moody hues broken up by a statement design. The room divider-esque pattern on this wall has hints of the Art Deco era that are echoed in the hand-painted drinks cabinet and other tonal furniture items and accessories.
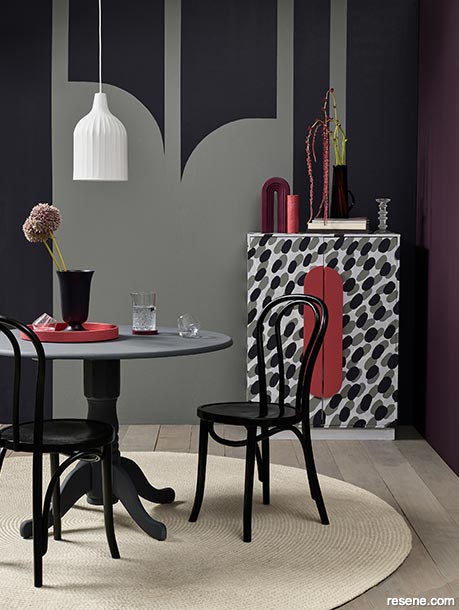
Left wall in Resene Revolver and Resene Gunsmoke, right wall in Resene Half Aubergine, floor in Resene Colorwood Mid Greywash, table in Resene High Tide, chairs in Resene Blackjack, tray in Resene La Bamba, vases in Resene La Bamba, Resene Half Aubergine, Resene Greywacke and Resene Mercury, coaster in Resene Half Aubergine, cabinet in Resene Mercury with painted design in Resene Greywacke, Resene Gunsmoke and Resene Revolver and handles in Resene La Bamba. Pendant light from Freedom, chairs from Cintesi, whisky jug from Flotsam & Jetsam, rug from The Ivy House, jug and candlestick from Karakter. Project by Kate Alexander, image by Bryce Carleton.
With your design decided, brush up on your tools. As a rule, bigger brushes hold more paint for a faster job, but the bigger the brush, the more experience is recommended. Ask a Resene Paint Expert online or at your local Resene ColorShop which is best for your project. For this one, as well as painter’s tape and a roller, you’ll need an angled ‘cutting-in’ brush to paint into the corners and around any trim. Use this specialist brush to cut in around the edges of the wall, then complete the rest with the roller, taking it as close to the cut-in areas as possible to blur the lines between the brushed and rolled surfaces.
Dark paint can be unforgiving, so go pro by getting your surfaces in good shape before you start. This might mean using a primer, filling holes or gaps, spot sanding to smooth dents, or sealing stains. Resene ColorShops have everything you need for this stage of the process too.
Different strokes: Left wall in Resene Revolver and Resene Gunsmoke, right wall in Resene Half Aubergine, floor in Resene Colorwood Mid Greywash, table in Resene High Tide, chairs in Resene Blackjack, tray in Resene La Bamba, vases in Resene La Bamba, Resene Half Aubergine, Resene Greywacke and Resene Mercury, coaster in Resene Half Aubergine, cabinet in Resene Mercury with painted design in Resene Greywacke, Resene Gunsmoke and Resene Revolver and handles in Resene La Bamba. Pendant light from Freedom, chairs from Cintesi, whisky jug from Flotsam & Jetsam, rug from The Ivy House, jug and candlestick from Karakter. Project by Kate Alexander, image by Bryce Carleton.
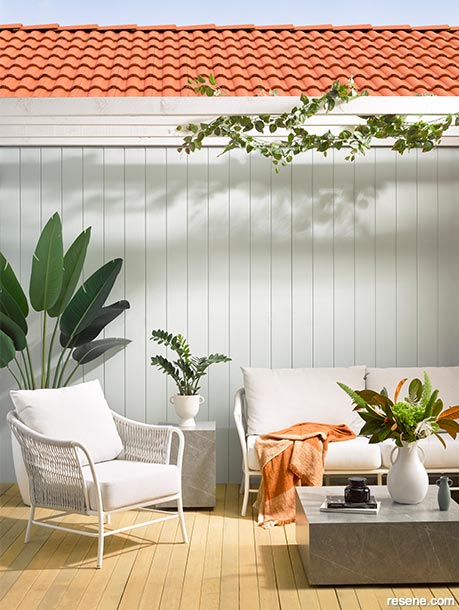
Let the good times roll: Pergola in Resene Sea Fog, wall in Resene Nebula, deck in Resene Woodsman Uluru, plant pot in Resene Eighth Tea, vases in Resene Eighth Tea (on plinth), Resene Sea Fog (on coffee table, large) and Resene Yucca (on coffee table, small). Chair and sofa from Poynters, side table and coffee table from King, throw from Città. Project by Laura Lynn Johnston, image by Melanie Jenkins.
With a bit of top-deck know-how, you can extend the interior of your home into an outdoor room that’s every bit as appealing as its indoor counterparts. This one features a grooved wall in cloudy blue Resene Nebula, for classic appeal whatever the weather, and a deck made inviting year round by a coat of warming stain Resene Woodsman Uluru.
Pergola in Resene Sea Fog, wall in Resene Nebula, deck in Resene Woodsman Uluru, plant pot in Resene Eighth Tea, vases in Resene Eighth Tea (on plinth), Resene Sea Fog (on coffee table, large) and Resene Yucca (on coffee table, small). Chair and sofa from Poynters, side table and coffee table from King, throw from Città. Project by Laura Lynn Johnston, image by Melanie Jenkins.
Pro tip: a roller is your best bet for a fast, flawless finish on large, flat surfaces such as these. Use a brush to cut into the corners and edges, then move your roller across the wall in a ‘W’ pattern, before inverting it and running it as close to the edges as possible. Once you’ve covered about 4m2, even up your coverage by ‘laying off’ the just-painted area – running the roller from the bottom to the top of the wall. Roll back down, then repeat, overlapping your first ‘lay off’ stroke by quarter to half the length of the roller. That done, move onto painting the next section.
A pergola forms the ‘ceiling’ of your outdoor room; ours is in Resene Lumbersider tinted to Resene Sea Fog. A go-to product for outdoor protection, Resene Lumbersider provides a durable, natural, low sheen finish that’s also fully washable.

June 29, 2022
When you’re tackling new projects you might find yourself also painting surfaces you haven’t prepped or painted before. Ask staff at your local Resene ColorShop for advice to make the job easier or use the free online Ask a Resene Paint Expert service.
Book a colour consult | Ask a Colour Expert | Ask a Paint Expert
Resene's decorating blog
Paint your home beautiful! Discover the latest decorating trends, tips and colour news.
![]()
Previous «
DIY tips for painting windows and trims
![]()
Blog home
View the latest trends, tips and news
![]()
» Next
Top tips to get a quick decorating refresh done in a weekend
![]() Get inspired ! Subscribe
Get inspired ! Subscribe ![]() Get saving ! Apply for a DIY card
Get saving ! Apply for a DIY card
![]()
Can't find what you're looking for? Ask us!
Company profile | Terms | Privacy policy | Quality and environmental policy | Health and safety policy
Colours shown on this website are a representation only. Please refer to the actual paint or product sample. Resene colour charts, testpots and samples are available for ordering online. See measurements/conversions for more details on how electronic colour values are achieved.
What's new | Specifiers | Painters | DIYers | Artists | Kids | Sitemap | Home | TOP ⇧