From BlackWhite magazine - issue 06, spectrum science
The key to perfect coverage starts from the bottom up.
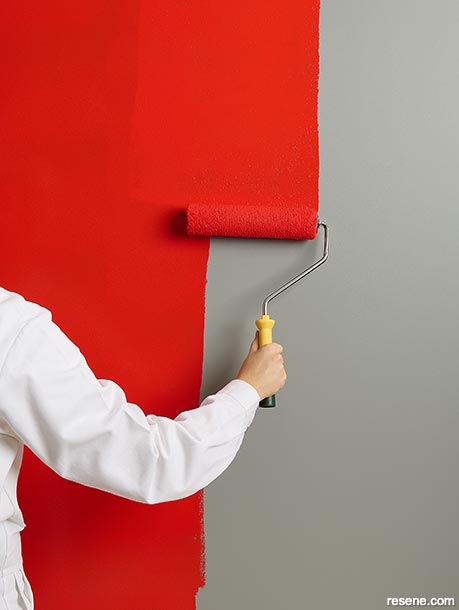
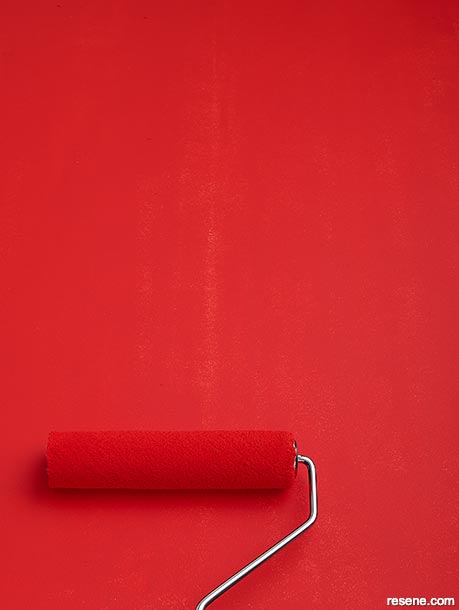
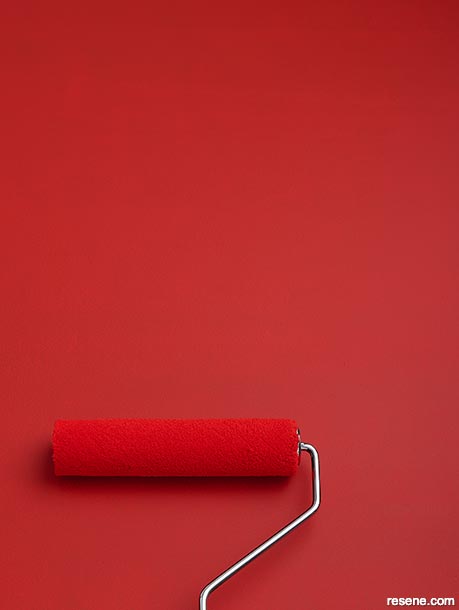
Bright, clear reds and yellows can be more transparent by nature as less opaque materials are blended with these pigments, so as not to muddy them and help keep their vibrancy. To improve the opacity of these types of colours and reduce the number of topcoats, Resene recommends starting with a tinted varishade undercoat. This first coat of Resene SpaceCote Low Sheen tinted to Resene Red Hot is being applied over Resene Acrylic Undercoat in Varishade 5. Projects by Amber Armitage, images by Bryce Carleton.
The final topcoat may be the only layer of your project’s coating system that your client ever sees, and the one that gets all the credit and compliments. But we’ve said it before and we’ll say it again (and again): the only way to ensure a beautiful finish is by putting in the right care and preparation. Patching and sanding, filling gaps, taping, cleaning and dusting your soon-to-be-coated surfaces are all important parts of that preparation process, but so too are the layers of product that are applied before your Resene topcoat.
When you’re specifying and applying a vibrant colour or one that’s significantly different from the existing colour, it pays to pick a paint system that you can be confident will give you complete and even coverage. For starters, you can be assured you’ll get the quality finish that both you and your client are expecting. But your specific selections can also save money, both in terms of product and application cost, without the need to sacrifice quality.
We spoke to the Resene Technical team to get a better understanding of the science behind coverage and the right products and tools to use for the best possible finish.
If you take a look at Resene’s data sheets or product tins, you’ll find that the majority of Resene interior and exterior topcoats require two colour coats to provide proper coverage, getting you the same opaque look that you see on your Resene swatch and for the product to perform as intended. However, certain bright, bold or deep colours may require an additional coat to get a uniform colour – especially if they are being applied over a significantly different colour. The organic pigments used to create bright yellows and clear reds, for example, are naturally more transparent. To maintain their high chroma, these hues are tinted into more transparent bases so as to not muddy them. When a more transparent paint is applied over a significantly different colour, what’s underneath can still show through even after the second coloured topcoat. In these instances, a Resene undercoat is particularly helpful.
The majority of paint primers and undercoats you’ll find on the market are only available in white or off white. However, applying a tinted undercoat reduces the number of topcoats required to get proper opacity for deeper, brighter, bolder and sheerer colours. Applying a tinted Resene undercoat is also more economical than applying extra topcoats as it is less expensive than the tint needed in the topcoats. Resene has thousands of different paint colours to choose from in both waterborne and solventborne bases. To ensure improved opacity for all those colours without the need for thousands of different coloured undercoats, Resene uses innovative varishades.
Resene varishades rely on some pretty fascinating colour science, and their success boils down to the extensive testing that’s carried out by the Resene Technical team.
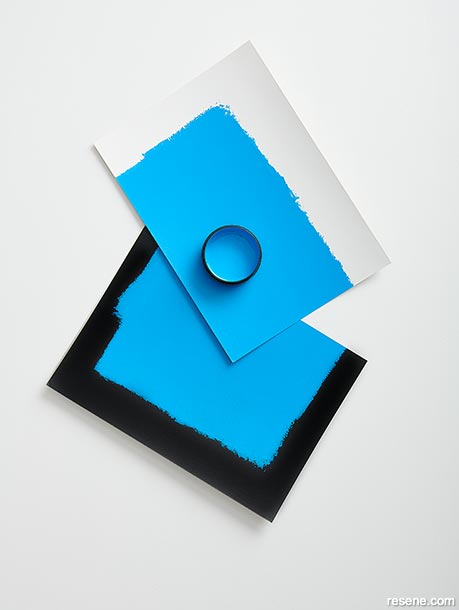
Many in the coatings industry used to assume that a white basecoat would be the optimal colour for a primer or undercoat, since white reflects back all colour waves and the raw ingredients used to make white paint are often the opaquest – so it would adequately cover up any colour that was beneath it. The trouble with white is that it can often show through some of those sheerer colours that we previously mentioned, making them appear ‘thinner’. This led to the idea that an undercoat that’s been tinted to the same colour as the topcoat would be the best option. But, in fact, for many colours, a grey undercoat is even better as it reduces reflectance and enhances the depth and body of the colour, so you see it in its full glory. In addition to a white undercoat, which still remains the best option for certain colours, Resene developed six different grey varishade colours (which are numbered 1-5 and 10 to indicate their greyness, rather than named) which allow for the perfect level of contrast between your undercoat and your topcoat colour.
How does Resene figure out which varishade is the right choice for your topcoat colour? “This is determined scientifically by applying the topcoats over drawdown swatches in black and white at known film weights – the thickness that the paint gets applied to different surfaces through different application methods – until full coverage is obtained. This may require multiple topcoats,” explains Resene Technical Manager Mike Clowes. “Then, the topcoat colour is applied over six new drawdown swatches that have been undercoated in white and the six Resene varishade tones varishade tone that produces the best match with the fewest topcoats applied over it is then chosen as the preferred undercoat.”
Choosing the right varishade for your chosen topcoat is easy: it is recommended through the Resene e-tint colour formulation system. Where an undercoat is recommended for a Resene colour, you’ll find it noted on the colour card with ‘uc’. Simply specify a Resene waterborne or enamel undercoat for your project and the Resene ColorShop team will select the appropriate varishade for your topcoat. However, if you are applying a darker colour to the exterior of your building, the science is a bit different – and thus so are Resene’s recommendations. In these instances, it’s recommended to choose a Resene CoolColour formula for your topcoat.
Resene CoolColour technology makes painting exterior surfaces in darker colours both easier and safer and can be used on all sorts of exterior materials and applications, from weatherboards and concrete to windowsills. A Resene CoolColour looks like a normal Resene colour, but thanks to special pigment technology, it reflects more heat, so it doesn’t get as hot as a normal colour would. Resene CoolColours are created by replacing the standard carbon black pigment that absorbs heat and light with a unique pigment that enables much of the infrared portion of the sun’s energy to be reflected. Visible and UV light will still impact the sun’s heating effect on your exterior surface, but your substrate won’t get as hot so it’ll be under less stress.
“For the best performance of Resene CoolColours, we recommend a white Resene undercoat rather than a Resene varishade,” says Mike. “Despite the appearance of full opacity, some of the sun’s infrared rays do penetrate the topcoat and these are best reflected back by a pure white undercoat in order to protect the substrate and minimise heat build-up.”
top tip Resene Acrylic Undercoat and Resene Enamel Undercoat are available in white and varishades. Resene Acrylic Undercoat is suitable for interior applications and exterior colours. Resene Enamel Undercoat is generally recommended for use under interior paint systems only. Use a white undercoat or primer directly beneath Resene CoolColour topcoats for maximum heat reflectance.
Of course, your basecoat is important, but your undercoat alone won’t give your project a perfectly opaque finish. Opacity and hiding power are important aspects of coverage in terms of how well a product hides the substrate, but in the coatings industry, it also involves the spread rate of the product and how much area it will physically cover. This is affected by different factors, such as whether the product is waterborne or solventborne, who is applying it, the application method, the tools used, the number of coats, the ambient temperature and humidity and even the sheen level.
It probably goes without saying that waterborne products and solventborne products are made up of different raw materials, but the same size tin of a waterborne paint with a higher gloss finish will have less pigment in it than one with a flatter or matte finish. When you think about it, it makes sense, because a glossier product has to be manufactured with more ingredients to make it glossy, so there will be less room in the tin for pigment. However, you’ll still want that product to give you an opaque finish without having to lay on a bunch of extra coats.
Thanks to the Resene Technical team’s vigorous testing and high-quality standards, paints in the Resene Total Colour System generally have the same coverage in terms of hiding power – no matter which formula you choose – so long as the product is applied according to instructions on Resene’s data sheets. This includes recommendations for the surface area that the product should cover, but also about the environmental conditions when the paint is applied.
When paint is cold, it has a higher viscosity, so there is a chance that it will be applied at a higher wet film thickness than the conditions it was tested under. Conversely, the paint’s viscosity is lower in warm weather and therefore has more tendency to spread further, which can result in poorer hiding if it is spread too far. High humidity slows down the drying time of waterborne paints, which could allow overspreading due to the paint not drying as quickly. While this may not make a huge difference on a smaller project, it’s important to consider these factors for larger projects to make sure you achieve the right coverage with the right number of coats.
did you know? The opacity of a paint is its ability to block light from getting though and the hiding power of a paint is its ability to adequately hide the surface it is applied to.
You may have guessed that applying paint with a brush versus a roller will result in a different wet film thickness of paint being applied, but it can also differ between types of brushes and types of rollers. Just like the other coverage factors we’ve mentioned, the Resene Technical team has put plenty of thought into this.

Resene developed six different grey varishade colours (which are numbered 1-5 and 10 to indicate their greyness, rather than named) which allow for the perfect level of contrast between your undercoat and your topcoat colour. Background in Resene Acrylic Undercoat in Resene White with brushstrokes in (from left to right) Varishade 1, 2, 3, 4, 5 and 10. Choosing the right varishade for your chosen topcoat is easy: it is recommended through the Resene e-tint colour formulation system. Where an undercoat is recommended for a Resene colour, you’ll find it noted on the colour card with ‘uc’. Simply specify a Resene undercoat, waterborne or enamel, for your project and the Resene ColorShop team will select the appropriate varishade for your topcoat colour.
When investigating coverage-related complaints, Resene found most occurred because a painter armed with a microfibre roller had spread the paint too thinly, causing the colour underneath to ‘grin through’. The act of applying paint with a brush results in the formation of ‘valleys and ridges’ within the paint film and ‘pimples and dimples’ (or orange peel effect) in a rolled film. Thinner film in the valleys and dimples would draw the eye, creating the impression of poor coverage. The ridges and the pimples, on the other hand, were excessively thick and afforded more hiding than required.
Before the advent of the many additives available today, which allow paint chemists to ‘dial in’ precise profiles for paint, everything from how well you controlled your applicator to the bristle types or lengths used in brushes to the nap lengths and fibre types used in rollers were far more critical. “Microfibre rollers do give a very uniform film thickness, but they can make it easy to overspread the paint. This led Resene to design paint with rheology properties to stop this happening in instances where the wet and dry film build was insufficient for complete hiding,” says Resene Senior Chemist Greg Percival.
A good test to ensure paint is not overspread is to consider the area you need to cover. One litre of interior paint from Resene is usually enough to cover around 12 square metres of wall space. If your wall is 6 square metres, then you should use around 500 mL per coat. If you find you are using a lot less product, it is being spread too far and you won’t get opaque coverage. It is always better to apply two coats of paint at the right spreading rate than applying more coats to add the paint that should have already been on the wall. Not only does this overspreading cost a lot more in terms of time, the product may not perform as intended.
Beware of cheap products that have overly large spreading rates. Premium paint provides better coverage because it contains more and better-quality pigment and resin. Cheaper products with larger spreading rates usually include more water, which means you are stretching the pigment further and will ultimately mean you will need to apply more coats to get decent coverage. Or the spreading rate may be overstated and you’ll find you need more to cover the area than planned.
Top tips
Along with using premium paint, it’s important to use high-quality application tools if you want a high-quality finish. The brushes, roller sleeves and painter’s tape available at Resene ColorShops help you apply the paint correctly so that you don’t waste time and paint on reapplication or unnecessary touch-ups.
Always allow the paint to dry before judging the paint finish. Many paint finishes will settle down after the initial drying phase.
When it comes to calculating the right quantities to get you opaque coverage on the various components of your project, the surface you are applying your coating to is a significant factor. For example, porous surfaces will always absorb more of what gets applied to them, so they can require additional paint in order to achieve full opacity of your topcoat colour. Materials like corrugated steel also require far greater quantities than a simple surface calculation would suggest because you have to take into account that all the vertical components also need to be adequately covered. Extrapolate that over the scale of something like a factory roof, and it’s going to need far more than your painter making a quick run to the Resene ColorShop to grab an extra tin. A good rule-of-thumb for calculating the quantity of roof paint required is to add approximately 40% of your project’s footprint area to allow for roof pitch, corrugations and soffit overhang. However, be aware that trough section roofing can require significantly more.
The Resene Technical team applies layers of each topcoat colour over drawdown swatches in black and white until full coverage is obtained to scientifically determine which varishade is the right choice. Then, the topcoat colour is applied over six new drawdown swatches that have been undercoated in white and the six Resene varishade tones until the coverage is consistent with the original full coverage swatches. The varishade tone that produces the best match with the fewest topcoats applied over it is then chosen as the preferred undercoat. For this test, two topcoats of Resene Key Largo have been applied over drawdowns in Resene Black and Resene White.
For most surfaces though, estimating paint is fairly straightforward math. You simply need the surface area of what will be painted (excluding doors and windows), the spreading rate of the product and the number of coats needed. Divide the surface area by the spreading rate and multiply those results by the number of coats and you will have the adequate quantity of product required for proper coverage over previously painted or undercoated walls that are in good condition. However, it’s always smart to round up to accommodate for a small amount of wastage and in case damage occurs as the project proceeds that requires touch-ups. To make things even easier, use the free online Resene Paint Calculator.
top tip When specifying, remember to include the cleaning products required to properly prepare your project prior to coating. For example, a complete roof paint system typically requires surface preparation using Resene Roof and Metal Wash, one coat of primer and two coats of topcoat at the recommended coverage rate.
As we mentioned earlier, white paint colours often provide better coverage than other colours by the very nature of their raw material components – but not all whites provide equal levels of coverage. Pure whites do not hide the substrate as well as undertone whites, which have a touch of another coloured pigment added to them – which is the case with Resene Alabaster, one of Resene’s most popular paint colours.
“The physics of white light scattering means that light has to bounce off the pigment particles and not be absorbed by anything, otherwise the colour would appear grey – even if the light waves only spend nanoseconds bouncing around inside the white paint film before being scattered to the observer,” explains Greg. “Some of those light waves may get absorbed by the substrate and never get back out of the paint. The purest white light scattering is about 98% of the incident light, as 2% of the light will be absorbed and lost due to the physics of light refraction. For a full white paint with no undertone colour, you need at least two coats applied at the specified spreading rate to achieve full hiding coverage. Many cheap paints require three or four coats, as their white paint contains less titanium dioxide than Resene’s does. Titanium dioxide is the costliest component of white paint, but it’s also one of the most important as it has the highest known refractive index of any colourless material.”
In most projects, there are some surfaces that need to be completely coated but not completely covered up. “Resene’s wood stains and clears are a different case as they are designed to be semi-transparent or completely transparent, so they have almost no coverage on an opacity or hiding basis,” says Greg.
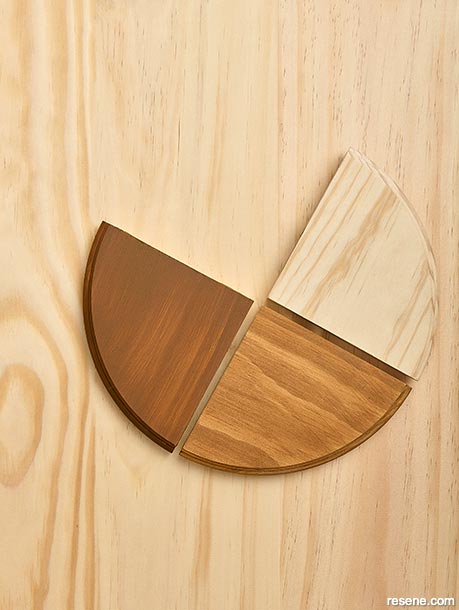
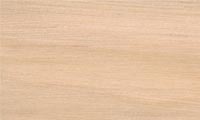
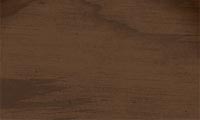
One of the most common mistakes made when staining timber is that applying more product is better. Sometimes, it is done to try and save time. Others incorrectly believe that a thicker coat will offer better protection, but that is not how Resene wood stains have been designed. In fact, applying too much product at once can cause the product to fail. In order to provide the timber surface with the advertised level of protection, Resene interior wood stains need to be allowed to properly penetrate the timber – which can only happen by applying it in thin, even coats and wiping off the excess product as directed. Too much wood stain applied in a single coat can also obscure and detract from the beauty of the timber’s natural grain. The quarter circles show unfinished pine (right), pine with a single coat of Resene Colorwood Nutmeg applied as directed (middle) and pine with far too much Resene Colorwood Nutmeg incorrectly applied (left). Timber background finished in a single coat of properly applied Resene Colorwood Whitewash.
One of the biggest coverage-related issues with these products is over coverage, where too much product is applied. Wood stains are designed to penetrate the timber, but if too much stain is applied, the stain will end up sitting on top of the wood instead of penetrating in. If the product is not able to penetrate the surface of the timber, the product can be tacky or fail – so it’s important that it be applied in thin, even coats and to wipe away excess interior stain before leaving it to dry. If more pigment is desired, continue to apply additional thin, even coats until you build up enough depth of colour to get the look you’re after or choose a darker colour.
Clear coatings are another product where building up thinner coats is better than trying to apply the product too thickly in less coats. Be sure to follow the application instructions on the data sheet or product container for optimal performance.
Another common coverage-related question that gets raised is whether or not Resene’s floor finishes can be used on walls. Since these products are designed for easy spreading on flooring, they’re not intended to be used vertically – so getting the correct coverage on walls can be very tricky. While it may take slightly longer to specify a second or third product, it’s well worth the effort to ensure the coatings on your project are right for each surface they’re being applied to. This way, you and your client can be certain that they’ll perform as intended and your design will keep looking great for years to come.
top tip The quantity of paint product required to cover ceilings versus walls versus trims and doors are all different. Use the free online Resene Paint Calculator at for recommendations of how much product will be needed for your project.
With all of this in mind, if you spot a coverage issue on site, your recourse will depend on the surface you’re coating and what product you’re coating it with.
“With most waterborne paint systems, once the paint is dry, you can put on an extra coat without any issues. But with some solventborne systems, the application time window can be quite tricky,” says Greg. “When the solventborne paint is first touch dry, you can put another coat on, but if it has been left too long the first coat starts to cross-link or cure, but the level is not enough to protect it from the solvent of the second coat. This means you can get wrinkling or other visual defects. If you leave the first coat on long enough to dry (24 to 48 hours), the cross-linking will be much greater and the first coat will be resistant to the solvent from the second coat. However, you may sometimes need to lightly sand between coats to guarantee good adhesion.”
If you find there is a defect between the first coat and the substrate (such as peeling, blistering or delamination) when using a solventborne two-pack product, Greg says that applying a second coat will make the problem worse in most cases. In these instances, it is recommended to remove the first coat and start again.
› For more troubleshooting advice, use the Resene Ask a Paint Expert service or call 0800 RESENE (737 363) in New Zealand or 1800 738 383 in Australia. For other coverage-related or product queries, ask your Resene Representative or talk to the team at your local Resene ColorShop.

This is a magazine created for the industry, by the industry and with the industry – and a publication like this is only possible because of New Zealand and Australia's remarkably talented and loyal Resene specifiers and users.
If you have a project finished in Resene paints, wood stains or coatings, whether it is strikingly colourful, beautifully tonal, a haven of natural stained and clear finishes, wonderfully unique or anything in between, we'd love to see it and have the opportunity to showcase it. Submit your projects online or email editor@blackwhitemag.com. You're welcome to share as many projects as you would like, whenever it suits. We look forward to seeing what you've been busy creating.
Earn CPD reading this magazine – If you're a specifier, earn ADNZ or NZRAB CPD points by reading BlackWhite magazine. Once you've read an issue request your CPD points via the CPD portal for ADNZ (for NZ architectural designers) or NZRAB (for NZ architects).
![]() Get inspired ! Subscribe
Get inspired ! Subscribe ![]() Get saving ! Apply for a DIY card
Get saving ! Apply for a DIY card
![]()
Can't find what you're looking for? Ask us!
Company profile | Terms | Privacy policy | Quality and environmental policy | Health and safety policy
Colours shown on this website are a representation only. Please refer to the actual paint or product sample. Resene colour charts, testpots and samples are available for ordering online. See measurements/conversions for more details on how electronic colour values are achieved.
What's new | Specifiers | Painters | DIYers | Artists | Kids | Sitemap | Home | TOP ⇧