Projects from Your Weekend magazine
A long weekend is a perfect time to take tea in bed. Sarah Withell funks up an old-fashioned idea.
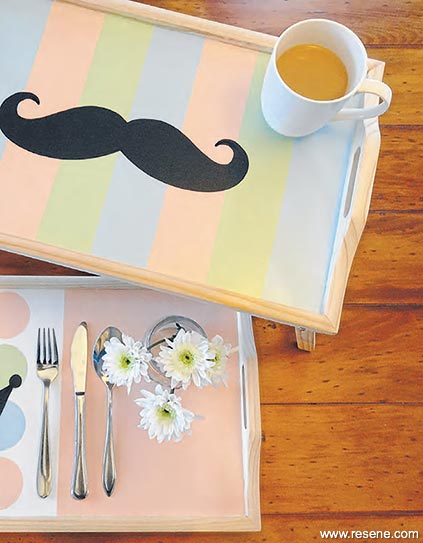
There’s nothing quite like breakfast in bed, and this upcoming Queen’s Birthday weekend gives you even more time for tea and toast. For this month’s project I have taken two basic breakfast trays and transformed them into cute and quirky ‘‘His’’ and ‘‘Her’’ versions. It would be so easy to make one for each member of your household, and kids would love them too. Personalise them your way, or follow my steps below for a tray fit for a queen (and a king).
For this project you will need
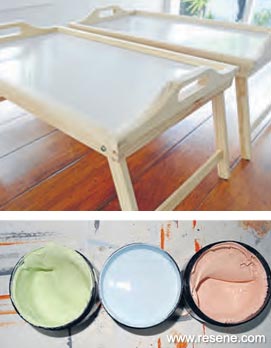
Step one: Mask the sides of your tray with painter’s tape so that you can paint the flat surface. Because the surface of most trays is very smooth, you’ll find paint won’t stick to it and you will need to prepare this area for painting. I recommend Resene Smooth Surface Sealer – you need only one coat, it applies easily and dries super-fast. It’s a handy product to have on hand if you are a keen DIYer because it can prepare all sorts of smooth surfaces such as laminates, glazes, glass and ceramics for painting.
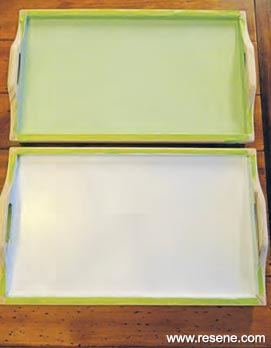
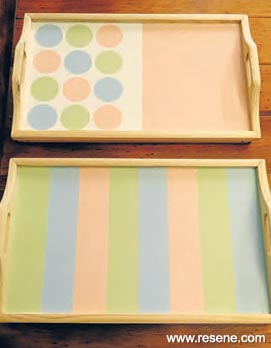
Step two: Choose a base colour for each tray. I used Resene Caper for His tray and Resene Hint of Grey for Her tray. You will need to apply two coats.
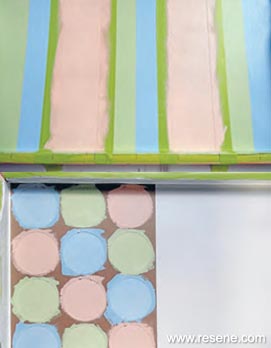
Step three: Mask out the pattern you wish to paint on each tray and start applying your colours. For His tray, I used painter’s tape to mask out stripes approximately 5cm wide. Just leave the existing colour you have laid down and simply add stripes in Resene Escape and Resene Wax Flower (or in layperson’s terms, create a green/blue/pink stripe pattern). For Her tray, I painted half the surface in Wax Flower and then polka dots in all three colours on the other half. Here’s a good tip for painting circles – the remains of an old sheet of adhesive labels provides a good stencil. Or you could pencil around a small glass or similar to get circle shapes.
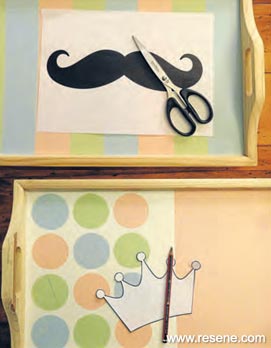
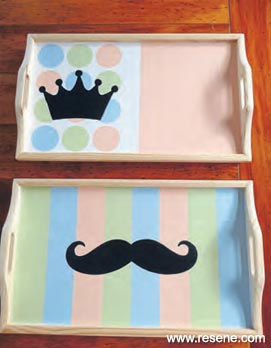
Step four: Choose a simple stencil image to paint on top of your background patterns. I chose a moustache for His tray and a tiara for Her tray. I printed copyright-free images from the internet. Simply cut out your shape, choose your placement on each tray, and trace around the outline carefully with a pencil. Fill in with black paint using a small paintbrush (you will need at least two coats).
Step five: To seal your works of art so that plates and cutlery don’t scratch off all your hard work, use a speed brush to apply Resene Aquaclear urethane varnish. And there you have it. All that’s missing is a scone and a hot cuppa. Put the jug on.
Words and pictures by Sarah Withell. 2015
▸ Download a PDF of this article
Projects from Your Weekend magazine
View more project ideas from Your Weekend magazine in the Resene weekend DIY projects section.
![]() Get inspired ! Subscribe
Get inspired ! Subscribe ![]() Get saving ! Apply for a DIY card
Get saving ! Apply for a DIY card
![]()
Can't find what you're looking for? Ask us!
Company profile | Terms | Privacy policy | Quality and environmental policy | Health and safety policy
Colours shown on this website are a representation only. Please refer to the actual paint or product sample. Resene colour charts, testpots and samples are available for ordering online. See measurements/conversions for more details on how electronic colour values are achieved.
What's new | Specifiers | Painters | DIYers | Artists | Kids | Sitemap | Home | TOP ⇧


