Paint systems for earthquake affected building — select the surface you will be painting from the list below to view how to prepare and finish the surface.
Walls – preparation:
Walls – finishing (by room/s):
Other areas – preparation and finishing
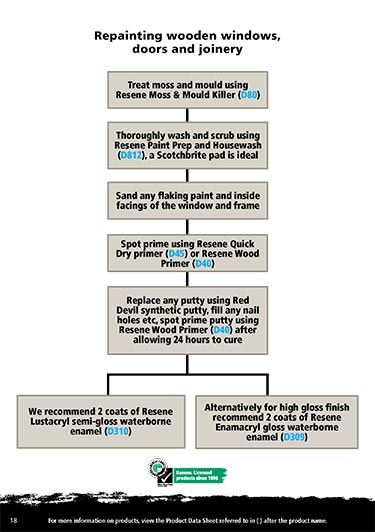
Note: For a visual of the steps below outlining how to prepare and repaint wooden windows, doors and joinery, please reference the PDF flowchart.
Note: For more information on products, view the Product Data Sheet referred to in ( ) after the product name.
The best way to wash and prepare windows is to use Resene Paint Prep and Housewash and 3M scourer or Scotchbrite pad, which is effective at reaching edges and recesses of windows.
Although not always done, the top, internal and bottom faces of the window should be painted.
Hack out and replace putty that has dried out and come loose – we recommend Red Devil or Bostik Synthetic putty as they can be primed within 24 hours with Resene Wood Primer and then painted with Resene Lustacryl or Resene Enamacryl. Traditional putty needs to cure for two weeks.
The inside faces will need sanding to ‘de-gloss’ them. Old enamel paint not exposed to U.V. light (the inside faces of windows and frames in particular) gets harder and more brittle over time and will need thorough sanding before painting. The exposed faces will need washing to ‘de-chalk’ if the paintwork is sound.
Substrates that are exposed at a 45 degree angle to the sun are subject to twice the level of U.V. attack that a vertical or horizontal surface will. In the same way that our nose will get sun burnt more quickly that our cheeks. This is why the top edge of a window sill will deteriorate more quickly than other painted surfaces.
We recommend Resene Lustacryl as its lower gloss conceals imperfections more effectively than the higher gloss Resene Enamacryl.
![]() Get inspired ! Subscribe
Get inspired ! Subscribe ![]() Get saving ! Apply for a DIY card
Get saving ! Apply for a DIY card
![]()
Can't find what you're looking for? Ask us!
Company profile | Terms | Privacy policy | Quality and environmental policy | Health and safety policy
Colours shown on this website are a representation only. Please refer to the actual paint or product sample. Resene colour charts, testpots and samples are available for ordering online. See measurements/conversions for more details on how electronic colour values are achieved.
What's new | Specifiers | Painters | DIYers | Artists | Kids | Sitemap | Home | TOP ⇧