Resene paint effects projects, project 07
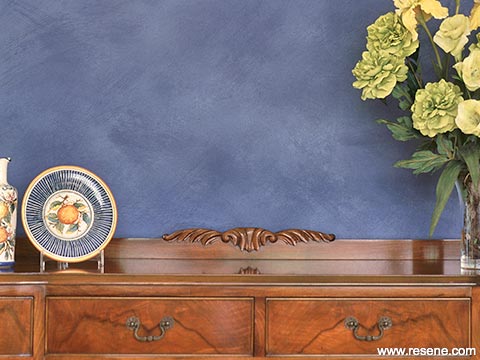
Colourwashing is a decorative way of applying paint to break up the colour.
A lighter colour base usually works best as it glows through the topcoat. Generally the best colour combinations are those that are close to each other in the colour spectrum. For example, creams through to yellow oxides, oxide based pinks through to oxide reds or greyed blues through to purple blues.
Colourwashing may be done over a smooth wall or over a textured finish, such as Resene Sandtex, depending on the finish you are trying to achieve.
For greater colour variation, do two successive coats of different colour, the first coat loose and uneven and the second coat the same way but soften with a dry brush or cloth. This technique also works well on a smooth or plastered wall.
Before you start your project, try different combinations and practice your application method on card until you are happy with the result. The translucent Paint Effects Medium glaze allows the background colour to show through the topcoats. You can vary the ratio of Paint Effects Medium to paint to change the effect – the more medium added the softer the colour will be.
Resene Sandtex may be tinted to a variety of colours. If the Resene Sandtex can’t be tinted to the colour you have chosen, apply to the wall as instructed in Step 1 then roll two coats of your selected colour on top using Resene Lumbersider or Resene SpaceCote.
Step 1
Step 2
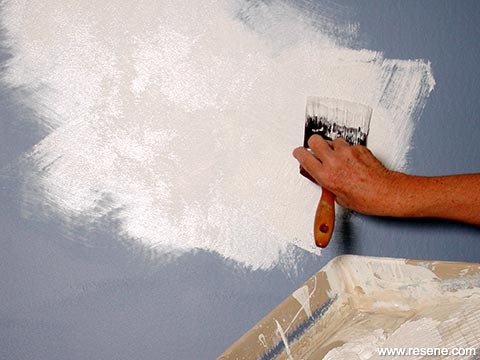
Step 1: Prepare walls as per the instructions on the paint container. Apply a basecoat of Resene Lumbersider tinted to Resene Kingfisher Blue and allow to dry. Apply Resene Sandtex tinted to Resene Kingfisher Blue by brush in a crows foot (criss-cross) fashion or apply with a roller, covering an area about 1 metre square at a time and brushing out in a criss-cross pattern to add more movement to the finish.
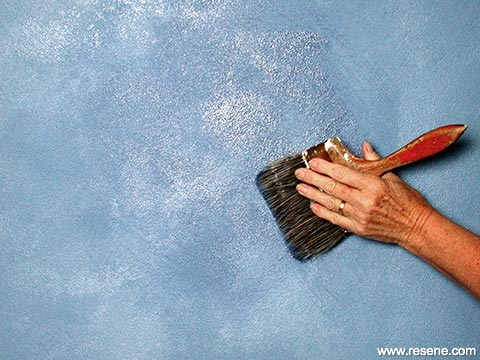
Step 2: Use the paint tray to mix your effects finish in. It’s easy to pick up a small amount of the effects finish on your brush from the tray.
Make sure you mix enough effects finish to finish the whole project. It’s very difficult to mix the same colour twice! The recommended mix ratio is: 3 parts Resene FX Paint Effects Medium,1 part Resene Cove Grey, 1 part water.
Vary these if you wish but make sure you try out the result on a piece of card first.
Dip the brush in the effects finish about 5-10mm and tap on the tray to remove excess paint. Hold the brush on the ferrule with your fingers on top and thumb underneath. It is easier on your wrist and arms to use your whole upper body to apply the paint to the wall. Try to keep loose and relaxed. Start at the top of the wall and using very light strokes apply the wash in a crows foot (criss cross) fashion over the basecoat. Keep the edges soft so it will be easy to blend the next section in. Work in an s-shape down the wall so that you don’t have a hard, straight edge building up.
› Download this project as a PDF
Project by Janet Scard. Photography by Joseph Zou.
![]() Get inspired ! Subscribe
Get inspired ! Subscribe ![]() Get saving ! Apply for a DIY card
Get saving ! Apply for a DIY card
![]()
Can't find what you're looking for? Ask us!
Company profile | Terms | Privacy policy | Quality and environmental policy | Health and safety policy
Colours shown on this website are a representation only. Please refer to the actual paint or product sample. Resene colour charts, testpots and samples are available for ordering online. See measurements/conversions for more details on how electronic colour values are achieved.
What's new | Specifiers | Painters | DIYers | Artists | Kids | Sitemap | Home | TOP ⇧


