Habitat bright ideas with Fleur Thorpe – DIY projects
Learn how to paint this peacock wall hanging using handprints to make creative feathers. Fleur Thorpe shows you how.
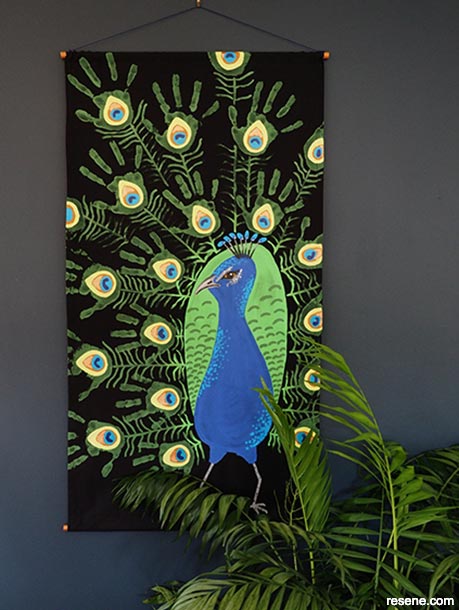
Wall colour – Resene Dark Knight
Step 1: Sew the top and bottom edges over to form a loop so that a piece of dowel can fit in it for hanging the finished wall hanging up. Fleur also sewed the two long side edges of the fabric over to give it a nice finished edge.
Step 2: Cut a large piece of cardboard to the same size as the fabric and use clothes pegs to hold the fabric on to the cardboard. This helps protect your work surface from getting paint bleeding through on to it. It also helps keep your fabric straight and taught.
Step 3: Use a white colouring pencil to sketch out the shape of the peacock’s head, body and back (Photo 1). Using an artist paintbrush, paint in the back of the peacock with Resene Tree Frog (Photo 2).
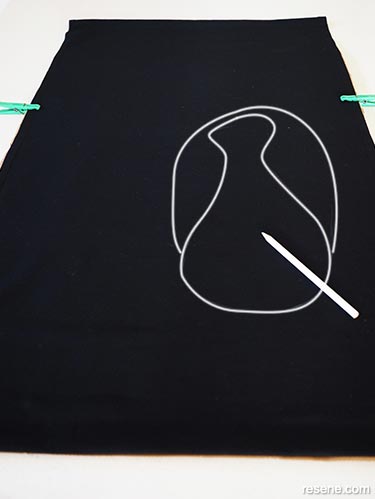
Photo one
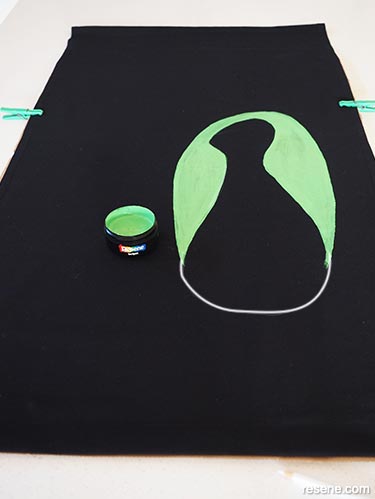
Photo two
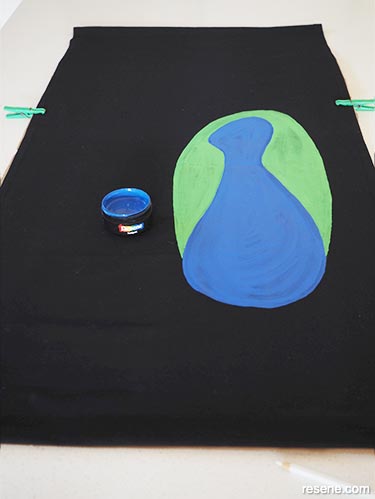
Photo three
Step 4: Use Resene Torea Bay to paint in the head and body (Photo 3).
Step 5: Next, use a medium-sized artist paintbrush to paint Resene Parsley onto someone’s hand for hand printing. Apply two layers of paint. The first layer of paint dries quickly due to the heat of the hand. Be liberal with the second layer of paint – this layer won’t dry so quickly as the first coat acts as an insulating layer. Place the handprints around the peacock’s body, fanning out with each successive layer. The handprints form the base of the peacock’s eye spot feathers (Photo 4).
Step 6: Now it’s time to layer up the different colours for the eye spots. First use Resene Happy Hour to paint on an egg shape on to the palm of the hand print. Make it as big as you can to add a good amount of colour and so that you have room for all the other paint colours (Photo 5).
Step 7: Next paint on a smaller egg shape using Resene Antique Brass. It will look like an avocado! (Photo 6).
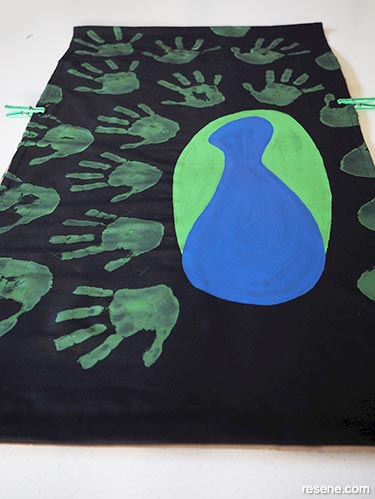
Photo four
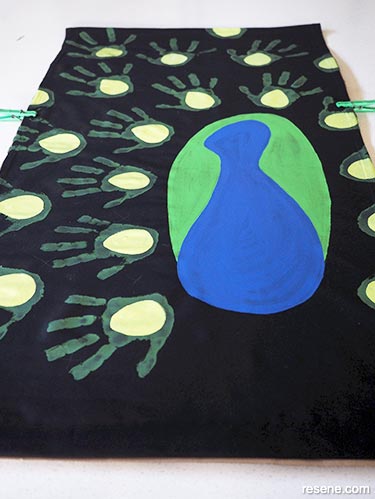
Photo five
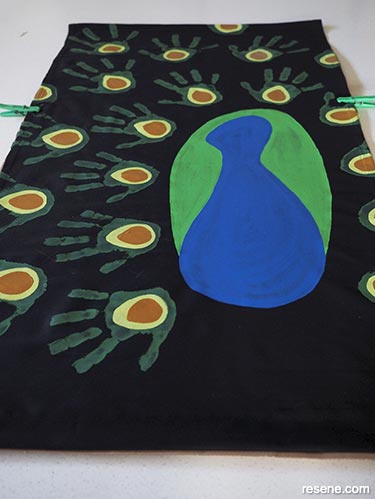
Photo six
Step 8: Using Resene Bowie, paint on a circle on top of the Resene Antique Brass (Photo 7).
Step 9: Finally, use Resene Surfs Up to paint on a crescent moon shape on the top half of the Resene Bowie circle (Photo 8).
Step 10: Finish by adding the feather spines for each of the eye spots using Resene Parsley. Use Resene Raven and Resene Black for the legs, beak and eyes. Fleur used Resene Bowie and Resene Surfs Up for the head crest, Resene Quarter Dutch White for highlights around the eye, and Resene Bowie and Resene Parsley for extra detailing on the body and back (Photo 9).
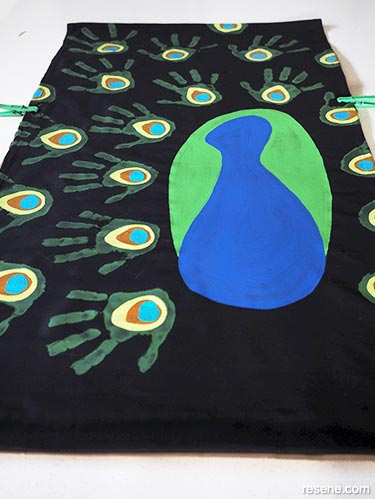 Photo seven
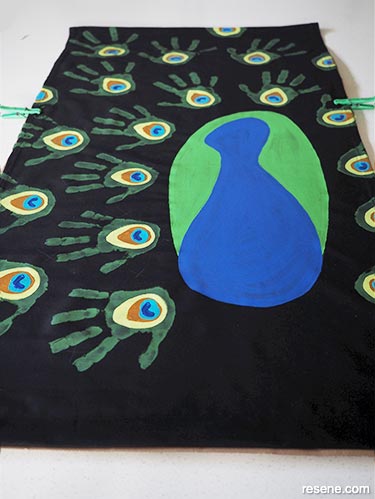 Photo eight
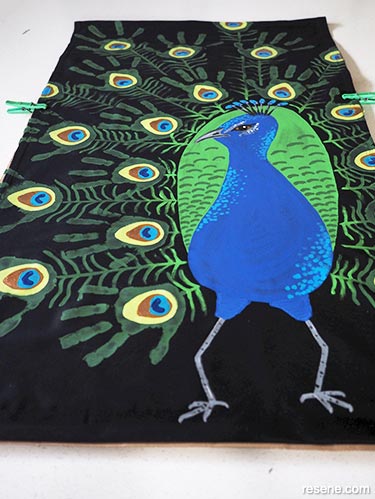 Photo nine
Step 11: Insert a length of dowel at the top and bottom and hang up using a piece of string.
Top tip: Fleur finished by adding an extra layer of Resene Magma on top of the Resene Antique Brass on the eye spots to give it a bit of shimmer. Use a green Resene metallic paint as a final layer on top of the handprints to give the shiny/iridescent look that peacock feathers have.
Styling and images by Fleur Thorpe. June 2020.
Habitat bright ideas
Need to add colour, pattern or a little creativity to your place? Check out these easy step by step DIY project ideas created in collaboration with Fleur Thorpe. We hope you enjoy making and painting these bright ideas and bringing colour to your home inside or out.
![]() Get inspired ! Subscribe
Get inspired ! Subscribe ![]() Get saving ! Apply for a DIY card
Get saving ! Apply for a DIY card
![]()
Can't find what you're looking for? Ask us!
Company profile | Terms | Privacy policy | Quality and environmental policy | Health and safety policy
Colours shown on this website are a representation only. Please refer to the actual paint or product sample. Resene colour charts, testpots and samples are available for ordering online. See measurements/conversions for more details on how electronic colour values are achieved.
What's new | Specifiers | Painters | DIYers | Artists | Kids | Sitemap | Home | TOP ⇧