Craft - inspired by Resene, from Little Treasures magazine
Mobiles and baby gyms offer movement and texture that fascinate babies, and help them to learn too. You can easily adapt these projects to suit your child’s bedroom.
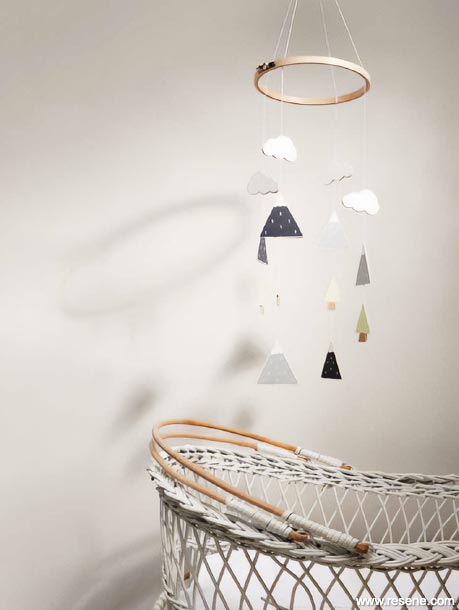
Use our online templates (treasures.co.nz) to mark out mountains, trees and clouds along one of the pieces of balsa wood.
Stack the two pieces of balsa wood one on top of the other, and use the ruler and craft knife to cut out mountains and trees. Use the craft knife to carefully cut the curves of the clouds on one piece, then use one of those as a template to cut more from the second. Paint six of the mountains in two coats of Resene Half Stack and the other six in Resene Gumboot, leave the balsa wood unpainted around the edges and leave to dry between coats.
Do the same for the trees, painting the trunks in Resene Sandal and the tops in Resene Sherbert. Paint the clouds in Resene Cotton Wool.
Use Resene Cotton Wool to paint snow on the top of the mountains in two coats and the snow drops on the mountains in one coat.
Cut the embroidery thread into four 1.5m long pieces. Brush PVA glue on the back of one of the mountains painted in Resene Half Stack and lay the embroidery thread on top so it extends out the middle top of the mountain. Brush glue onto its matching mountain and press on top. Do the same with a tree 5cm below the mountains. Leave another 5cm gap and add one of mountains painted in Resene Gumboot, followed by a cloud. Make another thread using the same process but with the mountains in reverse order. Then make two threads with a tree at the bottom, followed by a mountain and a cloud.
Place all of the mobile pieces between magazines and weigh down with something heavy. Leave overnight to dry.
Loosen the screw on the embroidery hoop and remove the inner loop. Wrap the embroidery thread of the mobile pieces evenly around this and tie in place.
Re-attach the outer loop and tighten with the screw.
There should be about a metre of embroidery thread left on each of the mobile pieces. Take these four pieces and knot together in the centre of the loop, about 40cm up the thread. Plait the remaining thread and fold over the top then knot to create a loop that you can hang your mobile from at the desired height.
Note: Balsa wood will curve a little when you apply paint and glue but flattens again when dry.
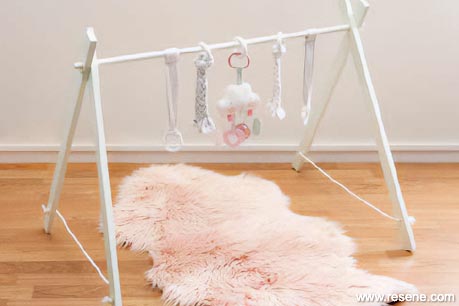
Drill a 19mm hole 100mm down from one end of each of the timber batons. Drill a 10mm hole at the opposite end of each of the batons.
Sand the baton edges, then roll up the sandpaper to sand the inside and edges of the larger hole in all of the batons.
Drill a 10mm hole 15mm from each end of the dowel. Sand the length of the dowel, hole edges and ends.
Paint all batons and dowel with a coat of Resene Quick Dry Sealer and leave to dry.
Paint with two coats of Resene Lustacryl, leaving to dry between each coat. Sand all pieces lightly before painting with the last coat of paint. Leave to dry.
Thread two batons onto each end of the dowel and push a small pine dowel piece through each of the holes in the dowel, to hold the batons in place.
Thread cotton rope through the batons on one side and knot at each end. Do the same with the other pair of batons.
Remove batons from one end of the dowel to thread on baby gym toys.
Plaited gym toy
Cut three 8cm strips from one of the cloths and iron in half lengthways. Stack strips together and sew together at one end, then plait strips and sew other end.
Fold plaited length in half and thread looped end through a wooden ring. Thread loose ends of the plaited length through the loop to secure to the wooden ring. Repeat with another cloth. 3 Use wooden ring to hang on baby gym.
Ring ended gym toy
Cut an 8cm strip from one of the cloths and fold both sides in so they meet in the middle and iron flat.
Fold in half lengthways to create a loop at one end. Fold unlooped ends over 60mm and sew to create a loop.
Thread large looped end through one of the rings and thread small looped end through the loop to secure to the wooden ring.
Repeat to make another one using one of the other swaddling cloths from the packet.
Use a small loop to hang on baby gym, so the wooden ring is hanging down for baby to reach and play with.
Change the shapes of the mobile to suit your room theme. You could try animals, letters, flowers, butterflies, cars or any other favourite items.
Make sure the mobile is placed high enough above the cot or anything that can be climbed on so it can’t cause any injury. It’s also best to make sure you place it so that adults looking after your child don’t end up colliding with it.
Baby gyms will tend to come in for a lot of touching so it’s best to use a pastel or mid-range colour, rather than anything too light. Light colours will show up marks and fingerprints more.
While it can be hard to tell which colour a young child might like, it’s a great opportunity to give older children a chance to get involved. Let them help choose the colour for their younger sibling using the Resene KidzColour chart.
Can’t decide on one colour? Use a variety. You can paint stripes or spots on the baby gym or go all out with each part of the mobile in a different colour. Use the rest of the paint colour to paint other elements in the room – perhaps drawer handles, painted names, or painted frames, to help co-ordinate the look.
If you prefer a natural timber look for the baby gym, use Resene Colorwood and Resene Aquaclear.
Always allow the paint to fully cure before using with a small child. Wipe the cured surface down with a damp cloth before using.
For a soft glow effect at night, paint part of the mobile in Resene FX Nightlight. When the lights go out your child can enjoy the soft glow, that will slowly wane the longer the lights are out.
Created by Sarah Eberhardt.
Photography by Bryce Carleton.Kid's Bedroom Decorating Ideas
View more decorating ideas for kids from Little Treasures magazine in the Resene kid's bedroom inspiration gallery.
![]() Get inspired ! Subscribe
Get inspired ! Subscribe ![]() Get saving ! Apply for a DIY card
Get saving ! Apply for a DIY card
![]()
Can't find what you're looking for? Ask us!
Company profile | Terms | Privacy policy | Quality and environmental policy | Health and safety policy
Colours shown on this website are a representation only. Please refer to the actual paint or product sample. Resene colour charts, testpots and samples are available for ordering online. See measurements/conversions for more details on how electronic colour values are achieved.
What's new | Specifiers | Painters | DIYers | Artists | Kids | Sitemap | Home | TOP ⇧


