DIY project from NZ Gardener magazine
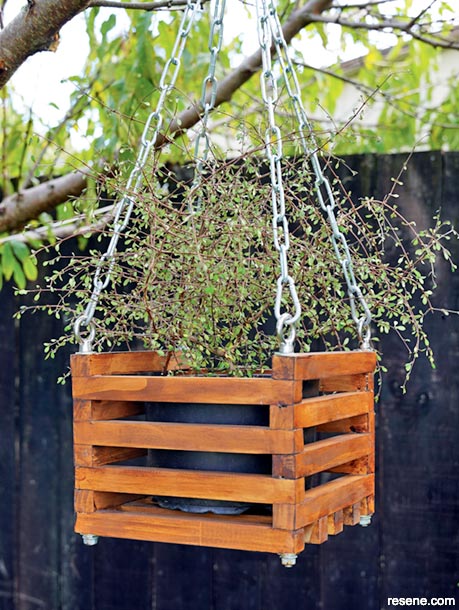
Jacob Leaf has stacks of fun making a cube-shaped planter with a Jenga aesthetic.
Materials
Paint colours
Tools
Cost: $100 excluding Resene products.
 Step one
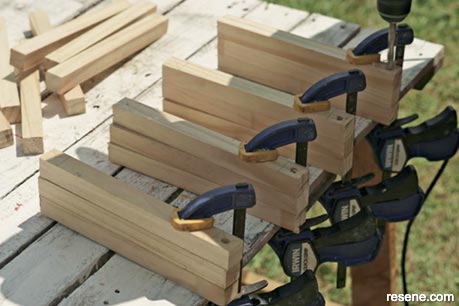
Measure and cut the square moulding into 19 x 250mm lengths. Clamp 16 pieces in stacked groups of three or four high, then drill 4mm pilot holes at both ends, followed by 10mm holes. The 10mm hole will allow some wiggle room when inserting the rods.
 Step two
Sand off any rough edges, then paint or stain.
 Step three
Secure the threaded rod in a vice or clamp it down to your work surface. Cut the threaded rod into four equal lengths with a hack saw or angle grinder.
 Step four
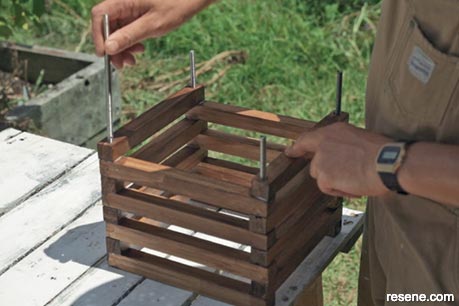
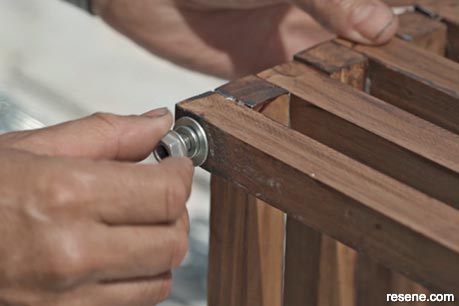
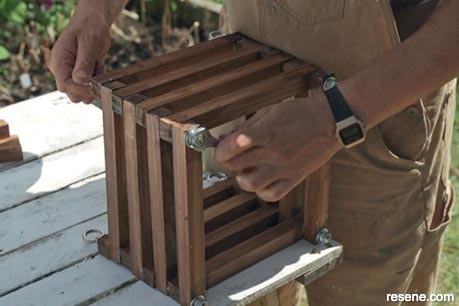
To assemble your basket, stack and glue the pieces of timber together, so there are four pieces per side – be careful to keep the holes aligned. Insert the four threaded rods into each corner then secure them with a flat washer, spring washer and nut on the bottom of each. Next, measure and trim the steel rods down to fit the eye nuts. Pop a flat washer on each, followed by the eye nuts. Tighten everything together.
 Step five
To attach the base, flip the planter upside down, arrange the remaining three pieces of timber so they are evenly spaced, then glue and screw them in place.
 Step six
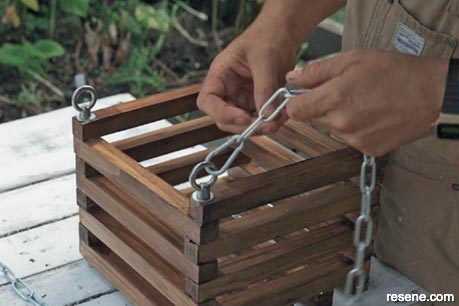
Attach the four pieces of chain to the eye nuts with four quick-link carabiners. Link the four ends of the chain together with the last carabiner then hang up the basket.
![]() Get inspired ! Subscribe
Get inspired ! Subscribe ![]() Get saving ! Apply for a DIY card
Get saving ! Apply for a DIY card
![]()
Can't find what you're looking for? Ask us!
Company profile | Terms | Privacy policy | Quality and environmental policy | Health and safety policy
Colours shown on this website are a representation only. Please refer to the actual paint or product sample. Resene colour charts, testpots and samples are available for ordering online. See measurements/conversions for more details on how electronic colour values are achieved.
What's new | Specifiers | Painters | DIYers | Artists | Kids | Sitemap | Home | TOP ⇧

